
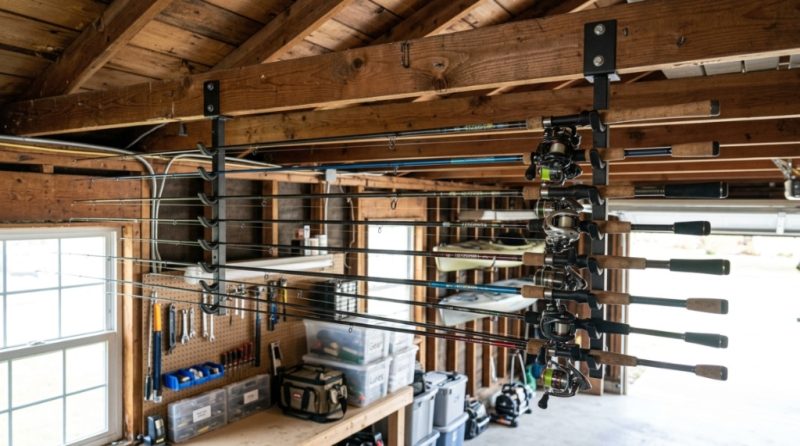
It’s the same story for every angler. You’ve got five rods leaning against the corner of the garage, two more tucked behind the water heater, and one that just got stepped on during a frantic search for a wrench. The problem isn’t your fishing addiction—it’s the lack of a proper storage system. Choosing the right garage fishing rod rack selection isn’t just about tidiness; it’s about protecting your investment, saving space, and ensuring your gear is ready when the fish are biting. Whether you have a two-rod setup or a tournament arsenal, this guide will help you navigate the choices, measure your space, and install a solution that actually works for your lifestyle.
In this comprehensive guide, we’ll break down the types of racks, the materials that last, the mounting requirements, and the common mistakes to avoid. We’ll also dive into the specific nuances of organizing a garage that doubles as a workshop, storage unit, and parking space. By the end, you’ll have a clear, actionable plan to get your rods off the floor and onto a system that looks professional and functions flawlessly.
Why Is a Dedicated Rod Rack Essential for Garage Storage?
A dedicated rod rack prevents physical damage, frees up valuable floor space, and keeps your gear organized for immediate access. Unlike leaning rods in a corner, a rack distributes weight evenly, preventing warping and tip breakage. It also reduces the risk of tripping hazards and accidental damage from garage traffic, making it an essential investment for any serious angler.
The garage presents unique challenges that a bedroom closet or basement doesn’t. Temperature fluctuations, humidity, vehicle exhaust, and heavy foot traffic all take a toll on your gear. A properly selected rack addresses these environmental factors. Moreover, a good rack system helps you maintain awareness of your inventory. You’ll instantly see which rods need new guides, which reels need servicing, and which setup is ready for the morning trip. This visibility is critical for maintaining your gear’s longevity and ensuring you never miss a fishing window because you couldn’t find your favorite rod.
Protecting High-End Gear from Physical Damage
High-modulus graphite and carbon fiber blanks are incredibly sensitive. A small nick or pressure point from leaning against a hard surface can create a weak spot that fails under the strain of a big fish. Rod racks with padded cradles or rubberized grips prevent these micro-fractures. Additionally, separating rods with individual slots stops the guides from tangling and clanking against each other, which can chip the ceramic inserts and scratch the blank’s finish.
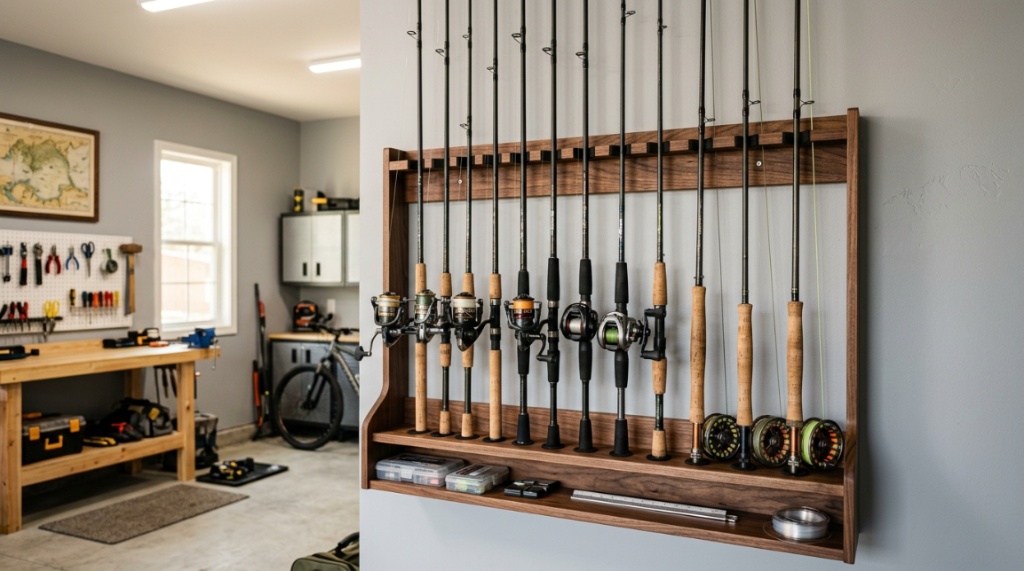
Reclaiming Floor Space and Reducing Clutter
Garage floor space is precious, especially if you still want to park a vehicle inside. A vertical wall-mounted rack can store 12-20 rods in the footprint of a road bike. Overhead ceiling racks are even better, utilizing dead space near the garage door opener. By moving rods to a vertical or overhead position, you clear the floor for tool chests, bikes, and freezers, immediately making the garage feel larger and more functional.
What Are the Main Types of Garage Rod Racks?
The primary types of rod racks are wall-mounted horizontal, wall-mounted vertical, ceiling-mounted, free-standing, and modular pegboard systems. Each type serves different space constraints and rod counts. The best choice depends on your garage’s layout, ceiling height, and the number of rods you currently own (or plan to own).
Let’s break down the pros and cons of each system. Understanding these will help you visualize the perfect setup for your specific square footage. For instance, a low-ceiling garage limits your overhead options, while a finished garage with drywall allows for more flexible wall placement. Consider how you access your garage—if you frequently move large items like plywood or ladders, overhead racks might be a hazard.
Wall-Mounted Horizontal Racks
These are the most common and beginner-friendly options. They consist of two or more brackets that hold the rod horizontally along the wall. They are excellent for shorter rods (6-7 feet) and are easy to install on studs. The main advantage is that you can see all your rods at a glance. The downside is they protrude into the garage, which can be risky if you back a car in too far. Always measure the depth of the bracket against your vehicle’s parking distance.
Vertical Ceiling-Mounted Racks
Ceiling racks hang rods vertically, either from the butt or the tip. These are superb for long rods (7-9 feet) and maximize wall space. They use a rope-and-pulley system for easy lowering or fixed tubes for permanent storage. A key benefit is that they keep rods high above vehicle clearance lines. However, you need sufficient ceiling height—at least 9 feet—to comfortably lower and raise the rods without cramping your head.
Free-Standing and Portable Racks
For renters or anglers who want flexibility, free-standing racks are the answer. These heavy-duty frames rest on the floor and hold rods in a vertical or tilted position. They often feature adjustable arms for reels and accessory trays. They are easy to move when you are cleaning or reorganizing, but they do take up floor space. If you have a large garage, this is a convenient, tool-free solution.
How to Measure Your Garage Space for a Rod Rack
Accurate measurement is the difference between a successful installation and a frustrating redo. You need to measure the length of your longest rod, the width of the wall space, and the ceiling height. Always add 12-18 inches of buffer space to the rod length measurement to accommodate the reel and handle. For horizontal racks, measure the distance between wall studs to ensure your brackets align.
Don’t just eyeball your garage. Take the time to sketch a simple floor plan. Mark where the garage door tracks are, where light fixtures hang, and where major appliances sit. This prevents you from mounting a rack that will be blocked by the garage door when it is open, or hitting a breaker panel that needs access. Also, consider the swing radius of the garage door springs and cables.
Calculating Rod Length and Reel Clearance
Measure from the tip of the longest rod to the end of the reel. For vertical storage, you need roughly 1.5 feet of clearance above the tallest rod to grip and remove it. For horizontal storage, measure the thickness of the rod with the reel attached to ensure the cradle is deep enough. A shallow cradle on a heavy rod with a large reel will cause the rod to roll out and fall.
Identifying Mounting Heights and Stud Locations
Use a stud finder to locate the wooden framing behind your drywall. Mounting directly into studs is non-negotiable for heavy loads. If your garage has metal studs or concrete block walls, you will need heavy-duty toggle bolts or concrete anchors. Mark the mounting height based on your reach—typically 18-24 inches below the ceiling for horizontal racks, which keeps them high but accessible.
Which Materials Are Best for Garage Rod Racks?
Your rod rack will be exposed to humidity, temperature swings, and potential moisture. The best materials are corrosion-resistant aluminum, powder-coated steel, and marine-grade polymer. These materials resist rust and warping, ensuring the rack maintains its structural integrity for decades. Wood can be beautiful but requires sealing to prevent moisture damage.
The choice of material also affects your rod’s protection. Look for racks with rubber, EVA foam, or felt liners on the contact points. Bare metal cradles can scratch the finish of your rods. If you choose a metal rack, ensure it has PVC inserts or rubber padding. Additionally, consider the paint finish—a textured powder coat is more durable and scratch-resistant than a smooth enamel paint.
Comparing Plastic, Aluminum, and Steel Durability
| Material | Strength | Corrosion Resistance | Weight | Best Use Case |
|---|---|---|---|---|
| Plastic (ABS) | Moderate | Excellent | Light | 2-6 Rods, Light Tackle |
| Aluminum | High | Good (Anodized) | Light | 8-12 Rods, Standard Use |
| Steel (Powder-coated) | Very High | Good (if coated) | Heavy | 12+ Rods, Heavy Reels, Saltwater |
Plastic is fine for light freshwater gear but can become brittle in freezing temperatures. Aluminum is the sweet spot for most garages—it offers high strength without the rust risk if it is anodized. Steel offers maximum capacity but is prone to chipping; if the coat scratches, rust will set in. If you live near the coast, stick with aluminum or polymer.
When Should You Choose a Vertical vs. Horizontal Storage?
Choose vertical storage when you have high ceilings and long rods (9+ feet), and choose horizontal storage when you have wide walls and shorter rods. Vertical storage is superior for maximizing space in a tight garage, while horizontal storage offers easier visual inspection. The decision also hinges on how frequently you access your gear; vertical racks often require a little more effort to remove a single rod.
Think about the weight distribution as well. Vertical racks store rods on their butts, which is a natural resting position. Horizontal racks, if not supported at the correct points (at least 1/3 from each end), can put stress on the rod blank over time. Always check the manufacturer’s specs on maximum rod weight and spacing. For surf rods or heavy trolling rods, vertical is almost always the safer choice.
Analyzing Ceiling Height in Single vs. Double Garages
Single garages often have lower ceilings, making horizontal wall racks the only viable option. Double garages with 10-foot ceilings are perfect for vertical drop-down systems. If you have a garage with an exposed beam, you can build a custom A-frame rack that leans against the wall, providing a hybrid solution. Measure the clearance of your garage door opener—you need to drop the rack lower than the opener unit to access it easily.
Can You Install a Rod Rack Without a Stud Finder?
Yes, you can install a rod rack without a stud finder, but it is risky. You can knock on the drywall to listen for solid audio cues, or you can look for outlets (usually mounted to studs) to gauge spacing. However, for a secure installation, it is best to invest in a cheap magnetic stud finder. If that fails, use heavy-duty drywall anchors rated for at least 75 pounds.
If you must use anchors, avoid installing the rack near the garage door track where vibration is heavy. Drywall anchors work well for static loads but can pull out with vibrating, dynamic loads. For maximum safety, always attempt to hit at least one stud with the longest screw. A rack that holds ten rods weighs over 20 pounds just in gear—you want it secured to the structural framework.
Using Toggle Bolts and Concrete Anchors on Block Walls
In many modern garages, the interior walls are concrete block or poured concrete. For these surfaces, standard screws will strip out. You need sleeve-style concrete anchors or zinc-plated toggle bolts. Drill a pilot hole with a masonry bit, insert the anchor, then tighten the bolt. Ensure your drill has a hammer function; drilling into concrete with a regular drill takes forever. For metal studs, use fine-thread sheet metal screws.
How Many Rods Should Your Garage Rack Hold?
Select a rack that holds at least 50% more rods than you currently own. If you have 6 rods, buy a 10-rack. This gives you room for expansion, guests, and the inevitable “new purchase” during the off-season. Overcrowding a rack damages the rods, as they press against each other and the reel seats tangle. The ideal capacity is roughly 5–6 inches of spacing per rod slot.
Assess your actual usage. Are you a fly fisherman with delicate 5-weight rods? Or a catfish angler with heavy baitcasters? Short fly rods can be bunched together, while spinning rods with long handles need more vertical clearance. Plan the rack layout to separate rod types, keeping the most-used rods on the edges for easy grab-and-go access.
Balancing Capacity with Wall Space Limitations
A 12-rod horizontal rack might be perfect in a long garage, but it requires about 12 feet of clear wall space. On the same wall space, you can store 30 rods vertically. Do the math on your square footage. In terms of storage density, vertical is 3-4 times more efficient than horizontal. If wall space is at a premium, prioritize vertical options.
Key Features to Look for in a Premium Rod Rack
Premium racks have specialized cradle grips that lock into the reel stem, adjustable widths for different rod lengths, and rust-proof fastener kits. Look for finger-friendly latches that open and close easily. A good rack also features a built-in level, pre-drilled holes, and clear installation instructions. Avoid racks that require re-drilling the wall and re-spacing—that’s wasted time.
Another hugely beneficial feature is the inclusion of separate storage for the reel. Some racks feature a “reel wing” that holds the reel secure while the rod butt rests in a tube. This prevents the rod from swiveling. Also, look for soft-touch foam that covers the entire length of the cradle, not just the tip. This maximizes the rod’s contact area, eliminating pressure points.
Evaluate Weight Capacity and Load Distribution
Check the stated load limit. A cheap rack may claim “holds 10 rods,” but only if they are ultralight panfish rods. Consider the torque on the mount—a heavy rod held horizontally exerts more force on the top bracket than the bottom. Ensure the rack is either angled upward or has locking pins for each rod. If you are storing high-end rods, pay the extra for a thicker gauge steel rack.
What Are the Common Mistakes Anglers Make with Rod Racks?
The most common mistake is maxing out the rack capacity and storing rods with lines still spooled tight. Tight line pressure puts tension on the rod blank, causing a permanent bend or curve over time. Always release the drag and loosen the line before storage. Another mistake is placing the rack in direct sunlight; UV rays degrade the epoxy finish and fade the rod graphics,a detailed garage fishing rod rack selection guide is a valuable next read to compare top-rated gear options side by side.
Other errors include, failing to account for the garage door opener, mounting screws that are too short, and not checking for level installations. A crooked rack causes rods to slide toward one end, creating uneven wear on the bottom cradle. Take your time to ensure the rack is level and securely braced against the wall. If you are storing rods with saltwater exposure, rinse the rod down before placing it in the rack to prevent salt crystals from rubbing off and scratching the rod during retrieval.
Avoiding Environmental Damage in the Garage
Garages are not climate-controlled, and that’s a problem for cork handles and lubricants. Cork can dry out and crumble in low humidity. Use a cork conditioner every few months. Also, be wary of exhaust fumes—if you warm up your car in the garage, the carbon monoxide and moisture can settle on your gear, promoting corrosion. Position your rack away from the tailpipe area of your parking space.
Step-by-Step Guide to Mounting a Wall Rod Rack
Here is a concise, repeatable process for mounting your rod rack correctly. First, clear the wall space and locate the studs. Second, mark the bracket locations and level them. Third, pre-drill pilot holes and insert the screws. Fourth, secure the rack and test the cradles with a single rod before loading the entire collection.
Let’s detail this process to ensure you avoid common pitfalls. This system takes about 20 minutes with the right tools and gives you a professional-grade installation that lasts for years.
- Tools: Drill, 3/16-inch drill bit, level, stud finder, socket wrench, pencil, and the included mounting hardware.
- Locate Studs: Use the stud finder to mark every stud across the wall. The track area will have plastic caps over the screws—do not mount near these if you can avoid them.
- Mark Height: Hold the rack up at the desired height and run the level across the top. Transfer the screw hole locations onto the drywall.
- Drill: If hitting a stud, drill a pilot hole slightly smaller than the screw. If using anchors, drill a hole the diameter of the anchor.
- Install Screws: Thread the screws into the studs, but do not fully tighten. Slip the rack over the screw heads and tighten them down securely.
- Test: Place a heavy rod in the rack and pull forward slightly to test the security.
Securing the Rack Against Vibration
Use a rubber washer between the screw head and the rack frame. This dampens vibrations and prevents the metal-to-metal squeak. Check the screws again after 30 days of use. Garages vibrate with door movement, and screws can back out over time. A simple check-up in a month ensures long-term safety.
How to Maximize Rod Storage in a Tiny Garage
For small garages or those packed with tools, the solution is a “dead corner” solution. Use a vertical corner rack that fits into the 90-degree angle of the walls, utilizing space that would otherwise be wasted. Additionally, use overhead pulley systems for the less-used rods, and keep the everyday rods on a vertical wall pole near the service door.
You can also build a PVC floor rack that stands between the parked car and the wall. This uses a 1-foot wide patch of floor and gives you 8 slots. Measure the width of the gap; if you have 14 inches of clearance, a PVC rack fits perfectly. These racks are also highly customizable for any rod count. They can be built in an hour for under $30, offering a cheap, effective storage solution.
Utilizing Overhead Space Above the Garage Door Tracks
The space above the horizontal garage door tracks (about 18 inches from the ceiling) is prime real estate. Install a ceiling-mounted track on telescoping arms that locks in place. This is ideal for surf rods or kayak paddles. Because they hang horizontally, they are easy to slide in and out. Just be certain you have an extra 6-8 feet of depth to maneuver.
Is It Worth Investing in a Custom DIY Rod Rack?
Yes, a DIY rack is worth it if you have unusual rod lengths, a non-standard wall configuration, or a specific aesthetic you want to maintain. Building your own allows you to control the material, capacity, and cushioning. You can build a rustic wooden rack with furring strips and cup hooks, or a modern PVC tube system that looks sleek and professional.
However, DIY only works if you have the tools and the time. If you value your weekends over saving $50, a commercial rack is the better investment. For those who lack wall space or are handy with power tools, a DIY project is incredibly satisfying. Regardless of route, it’s worth evaluating best practices in the niche—many high-quality racks are reviewed extensively by gear experts who test for corrosion and slippage. Trustworthy evaluations can help you decide whether to go DIY or buy premium hardware.
DIY PVC Rack Plans for Bargain Hunters
Buy 12-inch diameter PVC pipes and a 2×4 lumber board. Cut the pipes to 12-inch segments and attach them to the board with a high-grade epoxy. Mount the horizontal board vertically against the wall. This is an incredibly efficient system for vertical storage. Wrap the PVC edges with foam tape to protect the rod guides. This is a project that costs about $25 and solves a 20-rod closet.
Frequently Asked Questions
Here are some of the most common concerns anglers have when setting up their garage organization. These answers cover the nuances that aren’t always written in the product manuals.
How do I store fishing rods with large reels?
Store rods with large reels in a vertical position with the reel facing inward. This prevents the reel from interfering with the rod cradle and protects the reel handles. Ensure the reel is not resting against the wall joint; typically, this requires a rack with a deeper footprint or angled brackets.
Can I store rods in the garage during winter?
Yes, if the garage remains above freezing. Cold temperatures can make the rod blank brittle, so do not remove the rod from the rack and flex it immediately. Store rods in foam sleeves if freezing is a concern. Also, check the oil in your reels; cold temperatures can cause them to stiffen.
What is the most space-saving rod rack type?
The ceiling-mounted horizontal rack is the most space-saving for long rods, while a wall-mounted vertical rack is the most efficient for rod density. For absolute minimal footprint, a vertical ceiling drop is great, but it requires 9ft+ ceiling heights to be practical.
How far apart should wall brackets be spaced?
Space brackets at least 1/3 of the rod length from each end. For a 6-foot rod, place brackets at the 2-foot and 4-foot marks. This provides optimal support without bending the rod. For rods under 5 feet, a single central bracket can suffice if the rod is balanced.
Are metal rod racks safe for carbon fiber rods?
Yes, as long as the contact points are rubberized or padded. Bare metal will scratch the carbon fiber finish and cause stress fractures. Always pair metal racks with EVA foam liners, or wrap the metal bars in self-fusing silicone tape.
Make the Right Choice Today
The perfect rod rack for your garage is a balance of available space, rod inventory, and your personal access habits. Prioritize corrosion-resistant materials, measure twice, and install into structural studs. Whether you choose to go vertical for density, horizontal for access, or DIY for customization, removing the rods from the floor is the first step toward a more organized and safe garage. Take a moment to measure your space and order a rack that fits perfectly—your rods will thank you for it on the next trip out. If you are still on the fence regarding specific models and real-world user feedback.
